Blog
How to Draw Anime Pop Star Girl in 10 Step (Pop Idol)
")
This guide shows how to draw a pop star girl (also called pop idol in Japan) step by step in the the anime and manga style.
Showing how to draw a pop star girl consists of many different aspects so this is a very in depth tutorial. It explains how to draw the the body and pose, facial expression, hair and clothes appropriate for such a character.
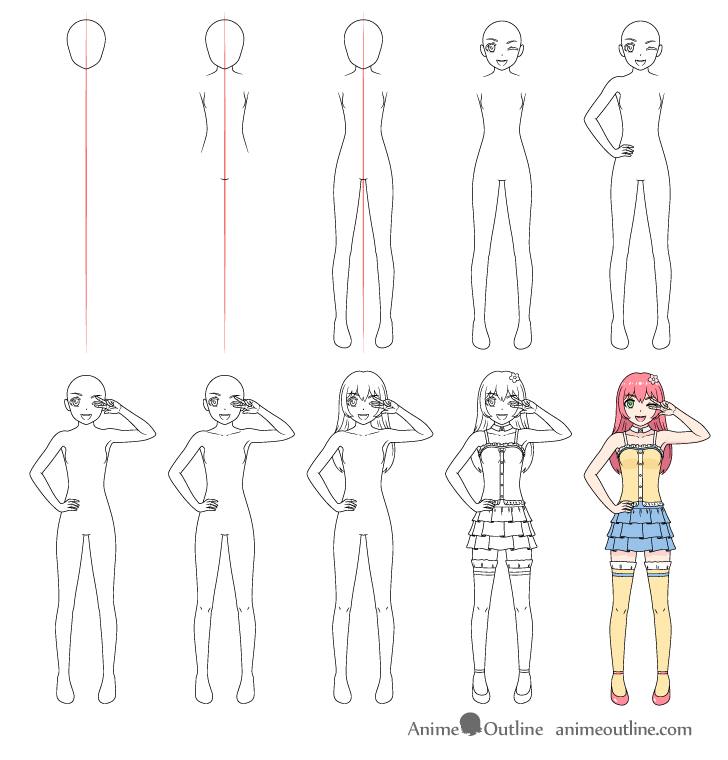
This guide employs a “see through method” where you first start by outlining the body and then draw the hair and clothes like layers over top (as though they are transparent). Such a method can help you avoid mistakes as you can see exactly where on the body you are positioning them without having to guess it’s shape. However, if you are going to be drawing on paper (not digitally) this mehod also requires quite a bit of erasing. If that is the case, be sure to keep your initial lines light so they don’t leave marks when erased.
Above is a video that shows how to draw the anime pop star girl line by line. The video provides a very in depth breakdown of the drawing process and makes it easier to see a lot of the smaller details that might not be as obvious in the images.
In addition to watching the video you should also read the instructions below for explanations of why things are drawn a certain way.
For more anime drawing videos see the AnimeOutline YouTube channel.
Step 1 – How to Draw the Head
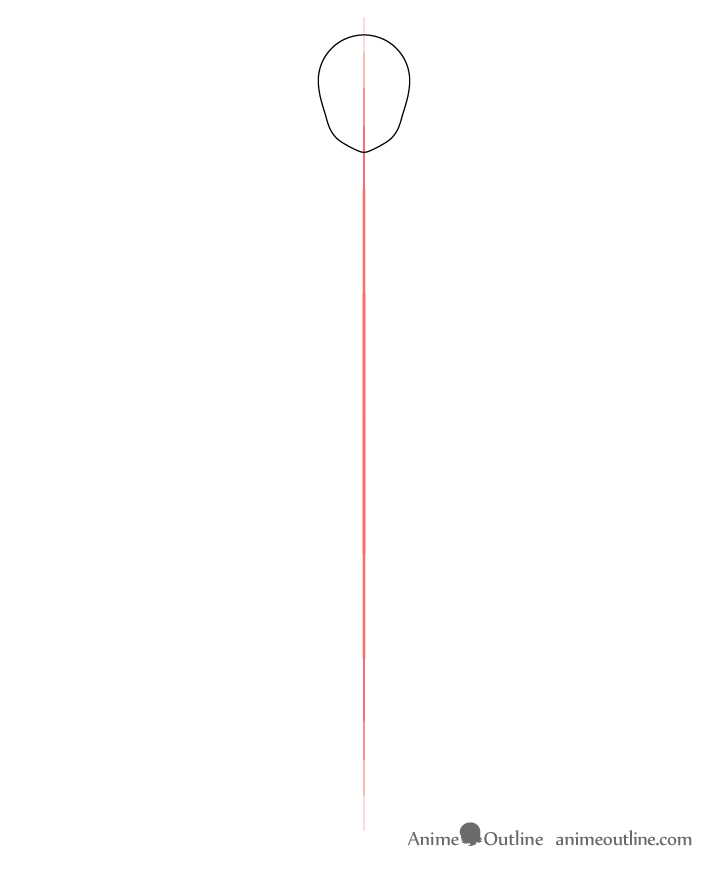
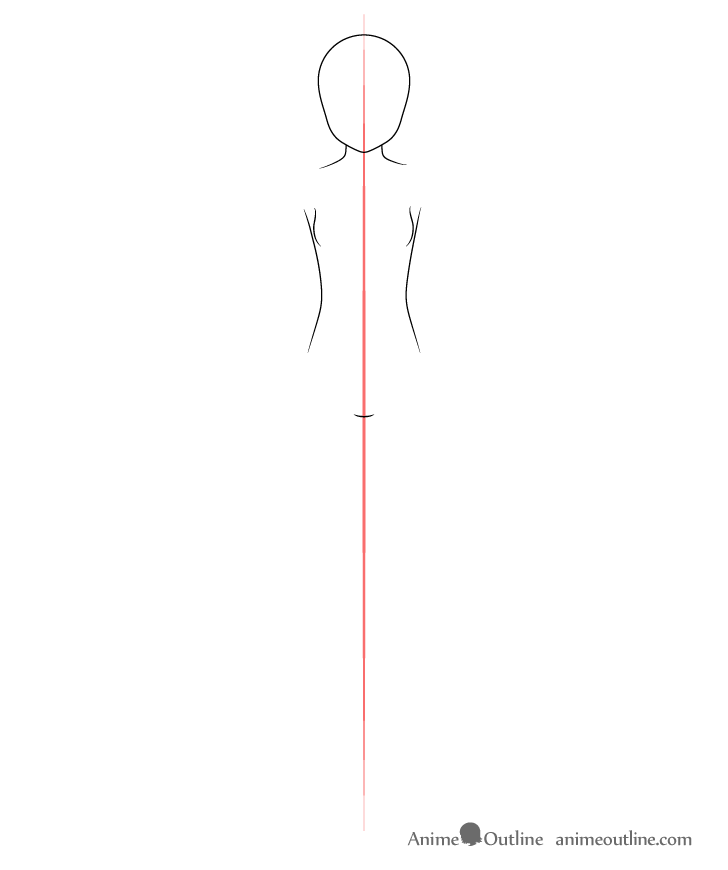
Star the drawing of the pop star girl by first making a straight vertical line that is slightly taller than you intend to make the body. The point of this line is to act as a guide that can help insure the drawing does not get skewed to one side. The line can also make it easier to see if both halves of the body are even in width.
Towards the upper end of the guide line draw the head. Keep in mind that you will need a little bit of extra room above it for the hair.
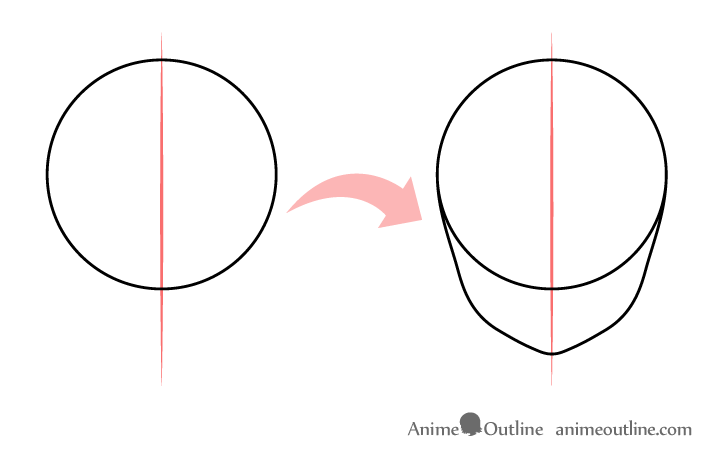
For the front view of the head (as in this example) start with a circle to get the basic shape of it’s upper part.
Going down from the circle add the lower part of the head. In this example the girl’s mouth is open so you will want to draw the chin lower down than normal. You can see a comparison between the head with the mouth closed and the head with the mouth open in step four.
First, draw the lower part of the face getting narrower as it goes down. Make this section “stretched out” as compared to when the mouth is closed. Next, draw it curving towards the bottom of the jaw. Make the jaw significantly narrower as it goes down. You can draw the lower part of the face one half at a time and then join the two sides with a small curve (the bottom of the chin).
Once you have the head outlined erase the bottom part of the circle.
For more on the structure of anime heads and faces see:
How to Draw an Anime Face (Structure & Proportions)
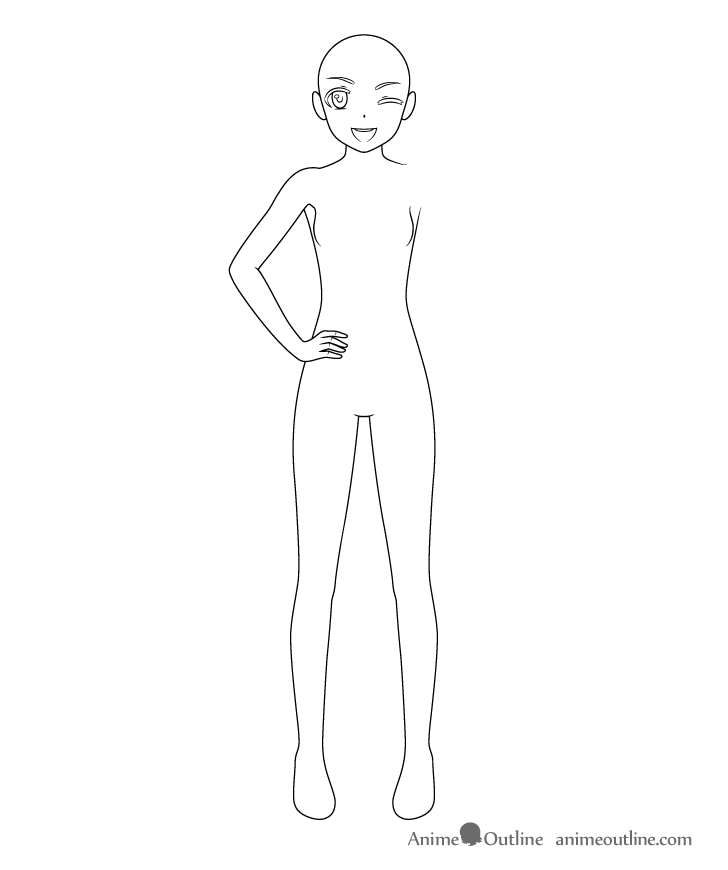
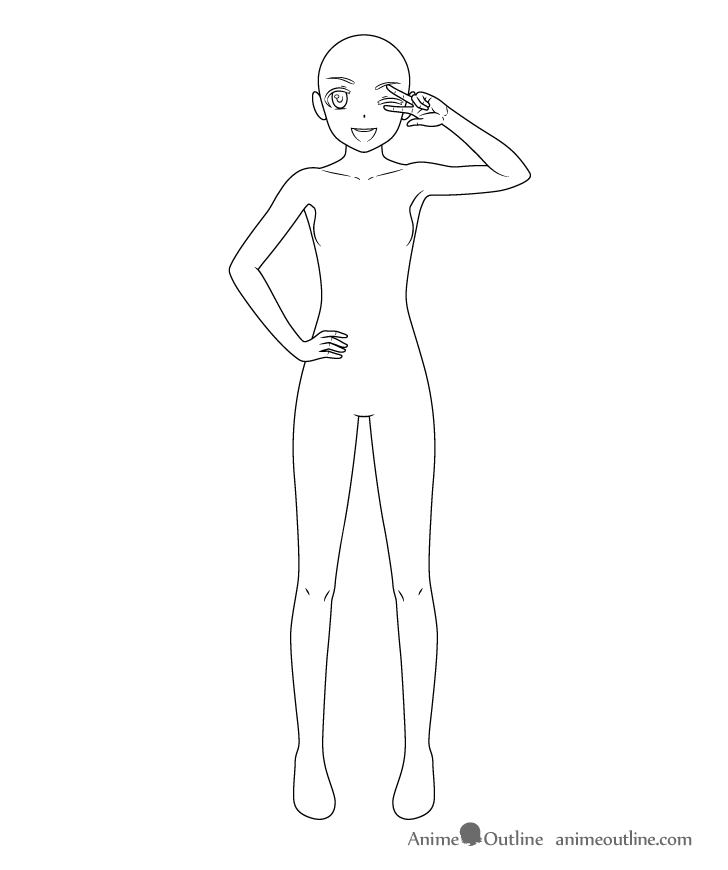
Step 2 – How to Draw the Body
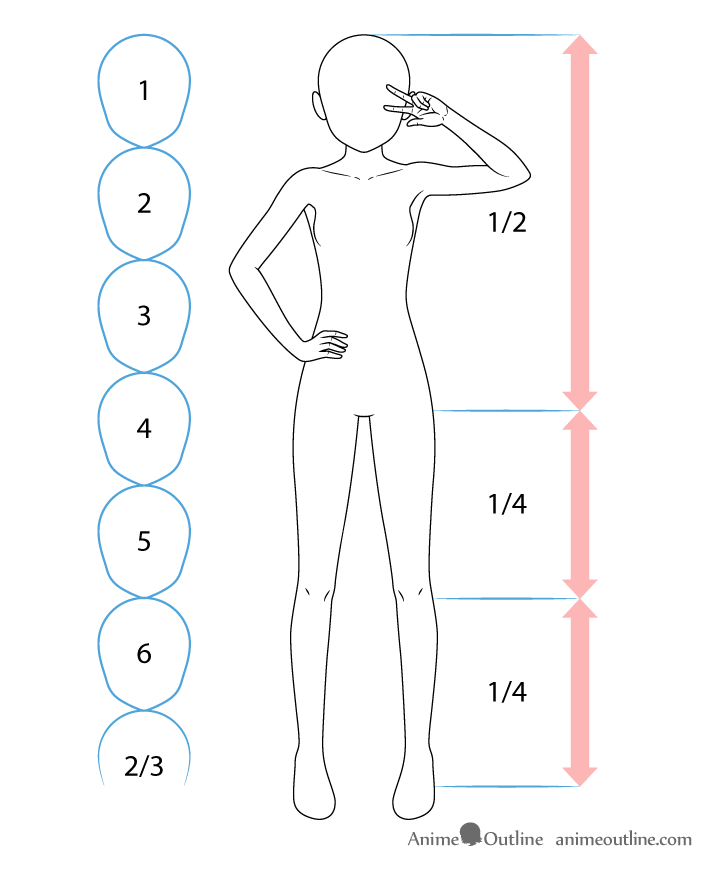
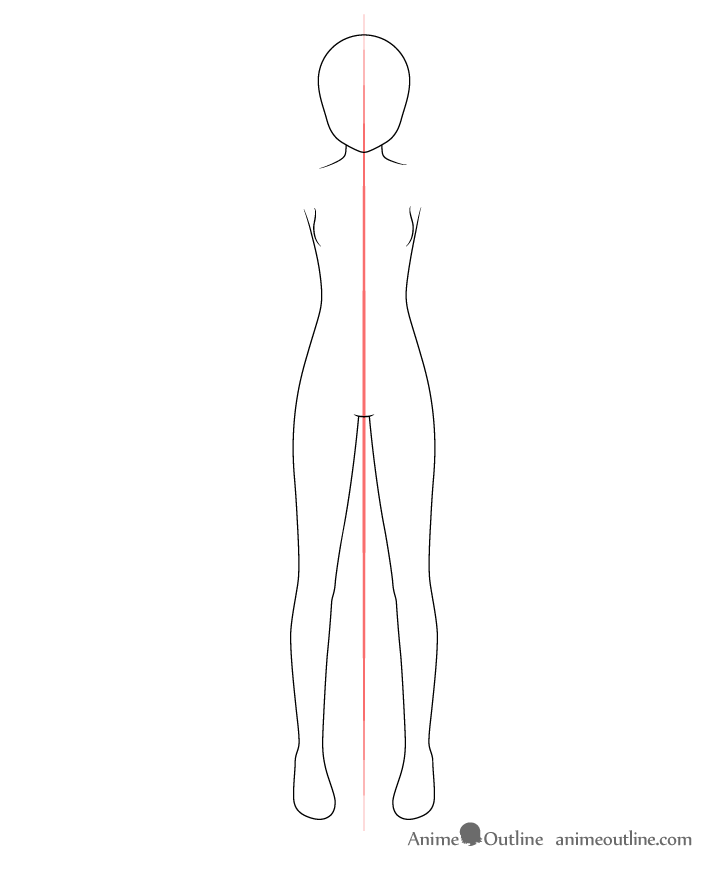
Be sure to leave enough room below the head for the rest of the body. In this particular example the girl is about 6 and 2/3 heads tall (measured from the top of the head down to the heels). Keep in mind that the measurement of the body should be done using a head where the mouth is closed. A head with it’s mouth open will appear “taller” and using that to measure the height of the body is incorrect.
You can refer back to this example as needed once you start drawing the other parts of the body.
For more on the proportions of an anime body read:
How to Draw Anime Girl Full Body Step by Step
Draw the body starting with the neck. As this is an anime neck, make it fairly narrow in relation to the head. The neck should then transition into the shoulder muscles that run downwards. Leave the ares where the arms are attached open (these will be added in later steps).
Below the arm openings draw the torso getting narrower as it goes down to the waist and wider again as it goes down towards the legs to create an hourglass-like shape. You can also draw the sides of the breasts.
Similar to the arms, leave the areas where the legs are attache open. You can indicate the bottom of the body with a small curve.
Step 3 – How to Draw the Legs & Feet
Draw the legs slightly farther apart than if the girl was standing in a more relaxed pose. This is fairly natural when someone has their arm on the hip.
For drawing different kinds of poses see:
How to Draw Anime Poses Step by Step
Make the length of the legs the same as the length of the body plus the head (as shown in the proportions image in the previous step). Measure their length staring from roughly the little bottom curve of the body down to the heels (not the toes).
Make the length of the upper legs down to the bottom of the knees the same as the length from the bottoms of the knees down to the heels.
Draw the feet angled slightly inwards. Feet generally tend to do this when the legs are spread farther apart and it’s also a common way to draw anime feet in general for a cuter look.
When drawing the feet just make an outline of their overall shapes. Don’t worry about any of the details such as the toes (the girl will be wearing shoes).
Step 4 – How to Draw the Face
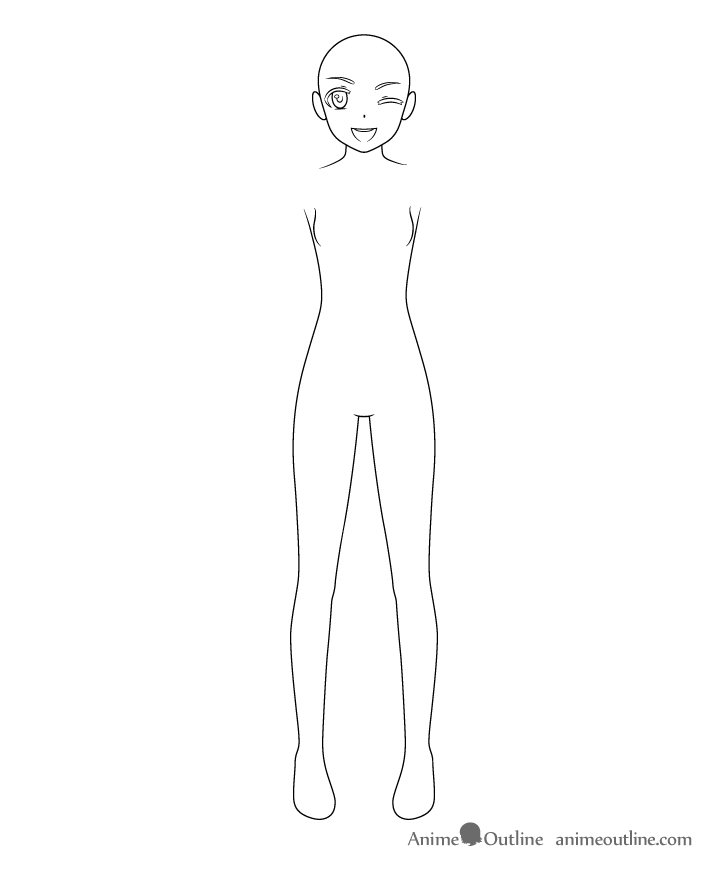
Generally, you would hold off drawing the face until the entire body is outlined. However, in this case you will need to position the fingers of the arm doing the peace sign over the eye. For this reason it’s logical to have an outline of the facial features so that you can do so more easily.
As already mention, in the example the girl’s mouth is open. This makes the proportions of the face more difficult to measure as it moves the chin which is an important reference point. To correctly position the facial features on the head with an open mouth, estimate where the chin would be when the mouth is closed and do the measurements based on that.
Drawing the Ears
You can position the ears with their tops lined up with the top of the eyes and their bottoms slightly below the outline of the nose.
The ears will be fully covered by hair in later steps but it’s still a good idea to be aware of their shape and placement so that you know how much hair volume is needed to fully cover them. It’s also helpful in case you wish to draw a different hairstyle.
For more ways to draw anime style ears see:
How to Draw Anime & Manga Ears (3 Different Ways)
Drawing the Outlines of the Eyes
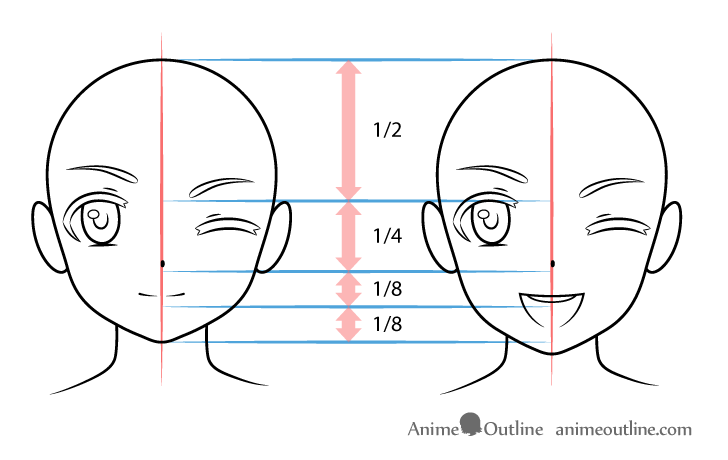
In this example the girl has one eye open and one eye closed (the one that the peace sign hand will go over). Position the open eye with it’s top right below the horizontal halfway point of the head. Again, the measurement need to be done as though the mouth is closed so for an open mouth you should measure the bottom from slightly above the chin.
Draw the closed eye with a curved shape and little splits on each of it’s ends to create a hints of individual lashes.
For more on drawing eyes in various states see:
How to Draw Closed, Closing & Squinted Anime Eyes
For a guide on various anime eye expression check out:
How to Draw Anime Eyes and Eye Expressions
Drawing the Eyebrows
Draw the eyebrow over the open with inner end slightly lowered (compared to a normal expression) and the one above the closed eye much lower down (it’s inner end again lowered).
For more variations of anime and manga style eyebrows see:
How to Draw Anime & Manga Eyebrows
Drawing the Nose
Draw the nose as pretty much a tiny oval that’s a little flatter on it’s inner side. Basically, this is not really an outline of the nose itself but of a shadow it casts to one of it’s sides. Position the “nose” slightly above the halfway point between the bottom of the head and the top of the eyes. Again, be sure do the measurements as though the mouth is closed.
For different ways to draw anime noses (also for drawing them from different angles) see:
How to Draw Anime and Manga Noses
Drawing the Mouth
Generally, you would position the mouth with it’s bottom lip halfway between the bottom of the nose and the bottom of the chin. Even if the bottom lip is not drawn (like is often the case on anime and manga) you could still assume it’s position and draw the opening of the mouth slightly above this. However, again, in this case the mouth is open (bringing the jaw lower down). This means that yet again, you have to estimate where the bottom lip would be and position the upper end of the mouth a little bit above that. This can get a little tricky but simply do your best to estimate.
Draw the mouth open and smiling and show a bit of the upper row of teeth. This will help create an happy/exited expression that is fairly common for a pop star.
For more on drawing anime moths in various states see:
Drawing the Eyelids
Once you have the eyebrows outlines you can draw hints of the eyelids as a tiny curves above each of the eyes.
Drawing the Pupil & Reflection
Finally, inside the open eye, draw a small oval shaped reflection and the pupil. You can leave the upper end of the pupil’s outline open. This will help the eye have less of a “stare” look.
You can carefully erase the vertical guide line from step one after you have the facial features drawn out.
Step 5 – How to Draw the Arm on the Hip
Draw one of the girl’s arms on her hip. Outline it running down from the shoulder, bent at the elbow and with the hand pointing upwards as it rests on the hip. You can erase a bit of the body’s outline when adding it in.
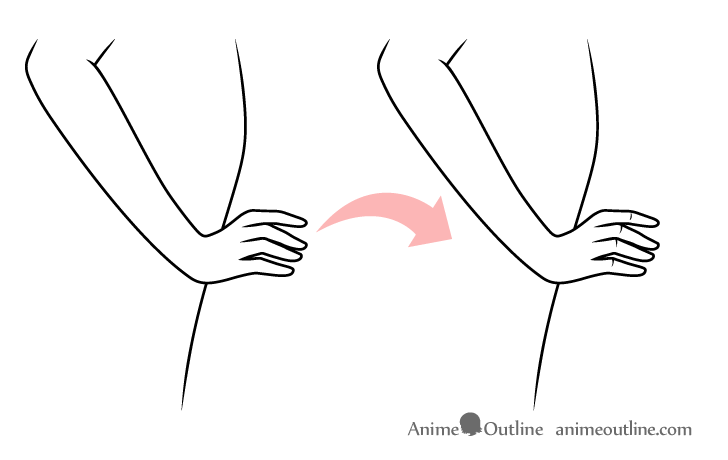
After you’ve outlined the hand draw hint’s of creases along the fingers.
To see a detailed breakdown of the hand being drawn be sure to check the video at the start of this guide.
Step 6 – How to Draw the Peace Sign Over One Eye
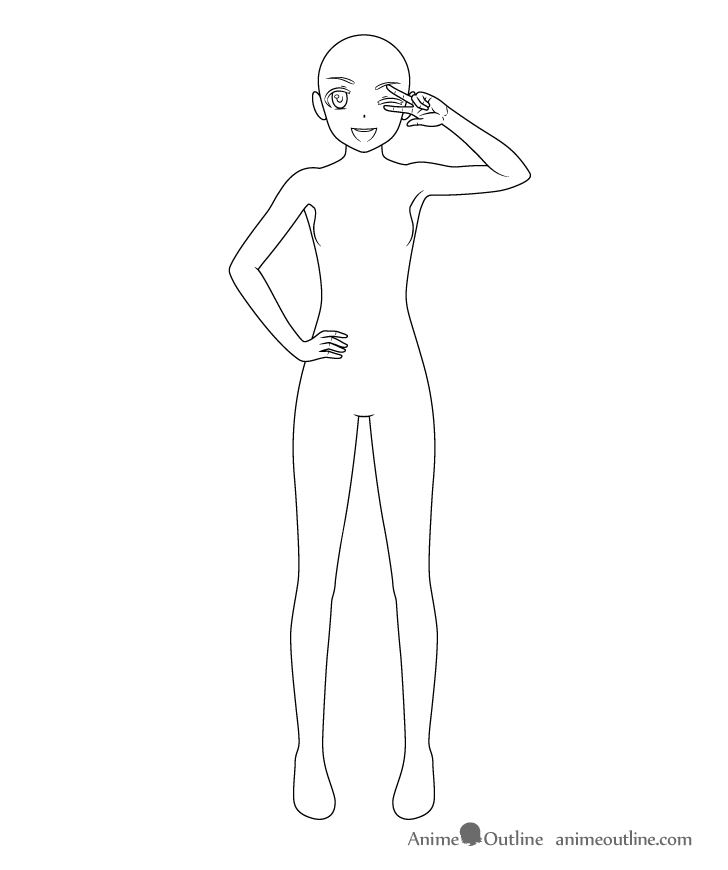
Drawing the peace sign over the eye can be somewhat complex so be sure to make it’s initial outline particularly light. That way you can more easily erase and redraw it if needed.
Draw the peace sign arm starting from the shoulder. Outline it’s first section as being pretty much parallel to the ground. You can then draw the area from the elbow to the wrist pointing up at the face. Finally, draw the actual peace sign starting with the thumb, followed with the two fingers over the eye and finally the rest of the hand.
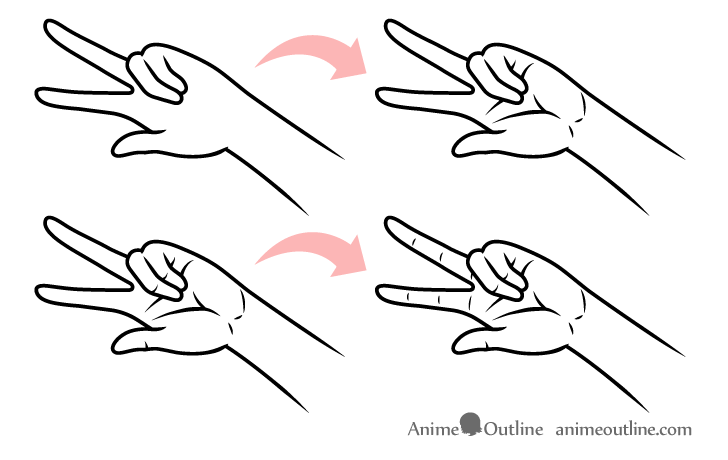
Once you have the main shape of the hand outline you can again add the creases along the palm and fingers.
For more on drawing anime arms in various poses see:
How to Draw Anime & Manga Arms Tutorial
Step 7 – How to Draw the Collar & Knee Bones
Once you have the main body outlined you can draw the collar and knee bones as shown in the example. Position the collar bones as running downwards from the shoulders with little curves on their inner ends.
For more on drawing collar bones see:
How to Draw Anime Neck & Shoulders
Draw the knee bones slightly close to the inner sides of the legs. Show each with just a pair of small curves as in the example.
Step 8 – How to Draw the Hair
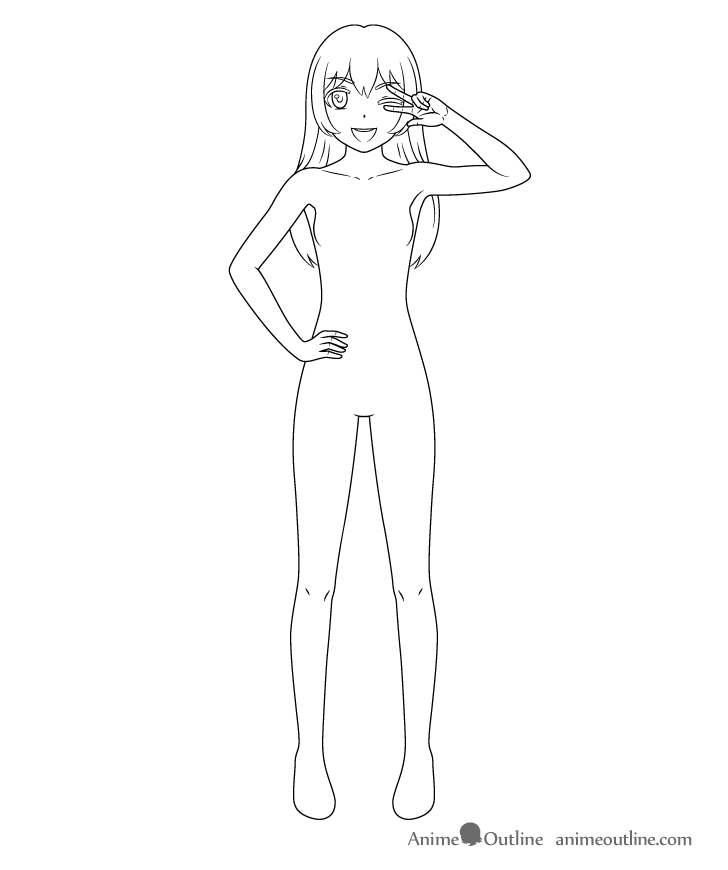
In this case the girl has straight long hair as is fairly common for leading female characters in anime and manga.
For drawing other character archetypes see:
How to Draw Anime Characters Tutorial
Draw the hair in three parts as is recommended in most similar guides here on AnimeOutline. Do so over top of the head’s outline as though the hair is transparent. First, draw the hair along the forehead (shown in red). Next, draw the hair along the sides of the head (shown in green) and finally, draw the hair on top and along the back of the head (shown in blue). The various parts of the hair are shown in different colors just to make them easier to distinguish. You can of course simply draw everything in regular pencil or in black/grey if drawing digitally.
For a more in depth explanation of this method as well as instructions on drawing different anime hairstyles see:
How to Draw Anime and Manga Hair – Female
Drawing the Hair Along the Forehead
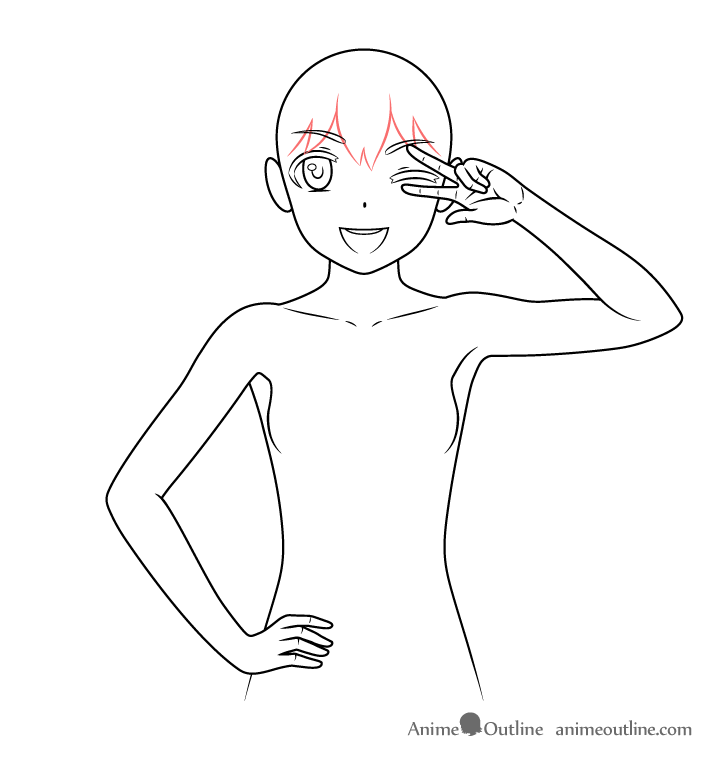
Draw the forehead hair starting with a large clump in the middle with splits on its ends. Draw the rest of the forehead hair swept to it’s respective side underneath the side sections (added next).
Drawing the Hair Along the Sides of the Head
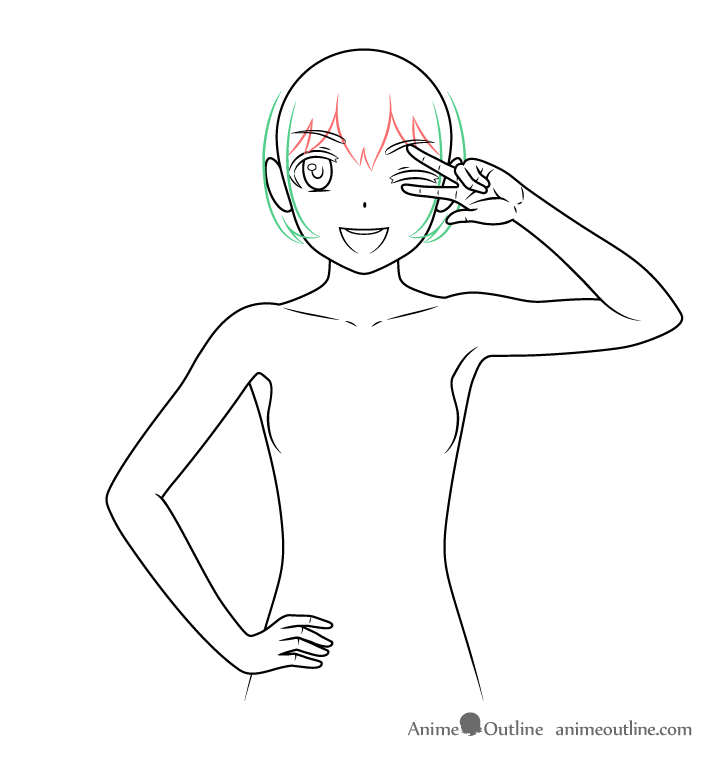
For this particular hairstyle draw the side section of the hair to be fairly short and position them curving around the head, “hugging” it’s shape very closely”. Also add a few small splits/clumps near their ends.
Drawing the Hair Along the Top & Back of the Head
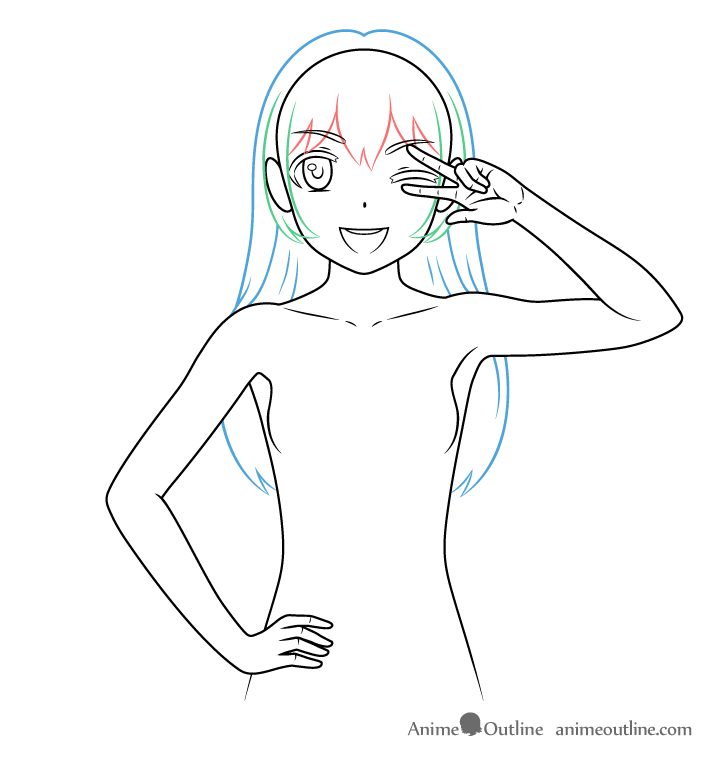
The top/back section of the hair shown in this example is quite long and runs well past the shoulders. Make it’s outline wider as it goes down and rests on the shoulders and then narrower again near the bottom.
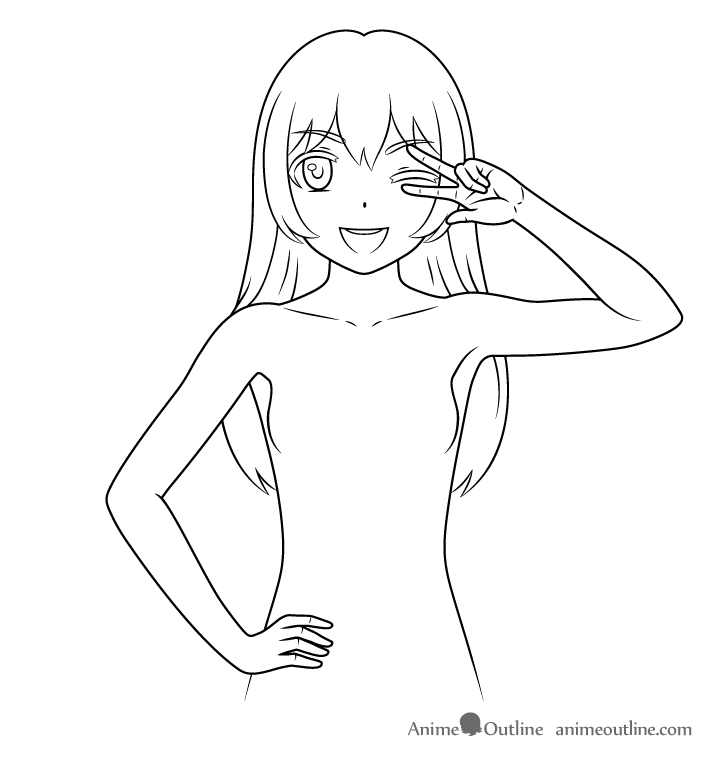
Once you’ve drawn all section of the hair erase the parts of the head that it covers.
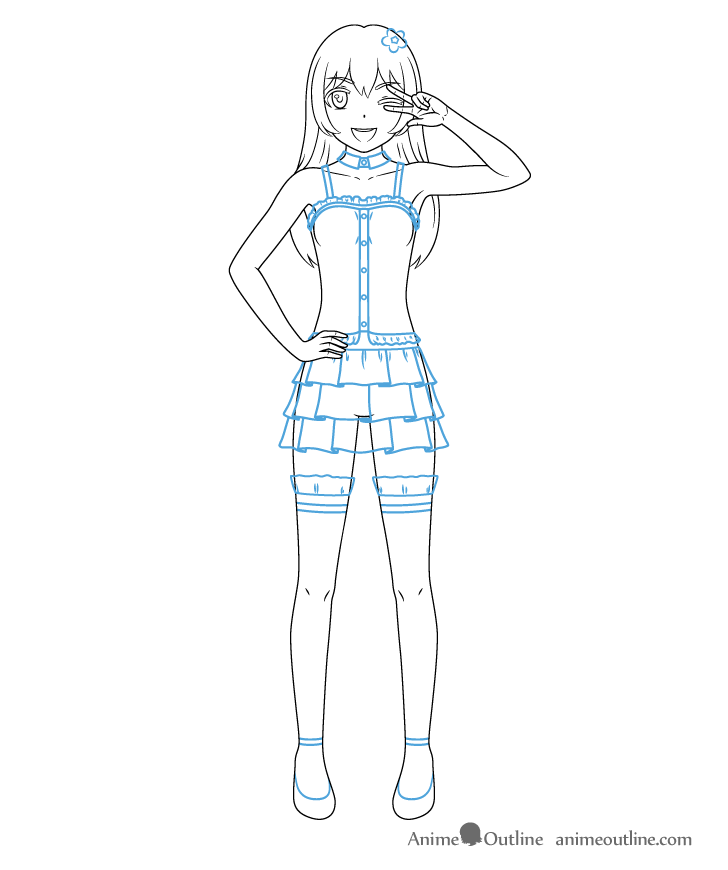
Step 9 – How to Draw Anime Style Pop Star Clothes
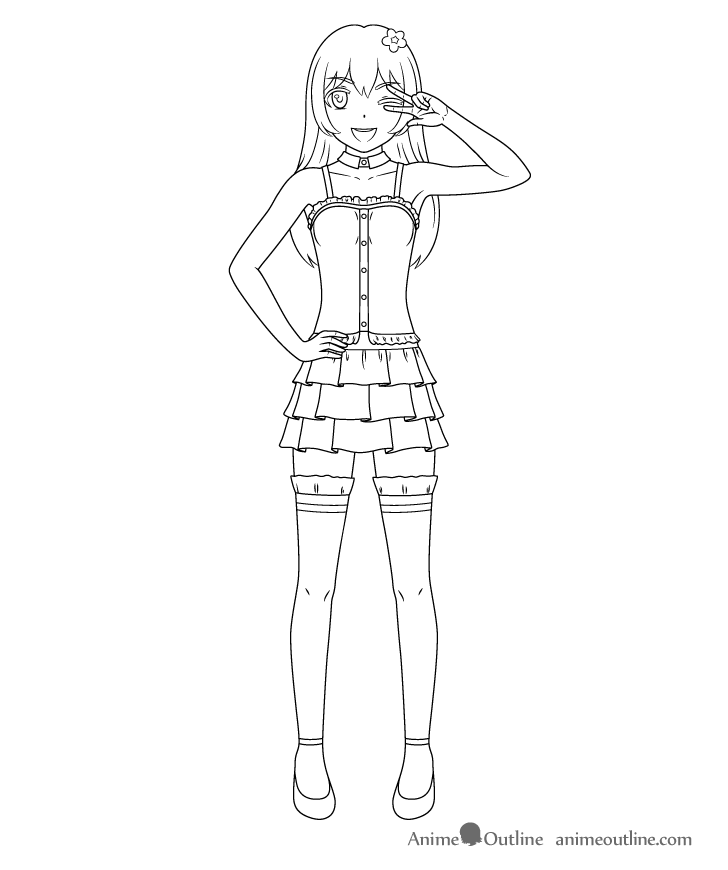
Outfits are major part of an overall appearance of pop stars and pop idols. In anime and manga they often wear cute looking and sometimes slightly unusual clothes and accessories.
In this case the girl is wearing the following:
- A blouse with frills
- A multi-layer skirt
- Stockings with frills
- Dress shoes
- A sakura flower shaped hair ornament
Similar to the hair draw the clothes over top of the body’s outline as though they are transparent.
How to Draw the Blouse
Add the clothes starting with the blouse.
While you don’t need to be a fashion design to draw anime style clothes, you should put at least some thought as to how they will be worn. Otherwise you might create a design that realistically could not be put on.
In this example the blouse has a collar that is detached from it and worn around the neck like a necklace. This is done to create a slightly more unusual/out of the ordinary look. The upper frills and the shoulders straps actually come from a separate piece worn underneath the main part of the blouse. Such a design allows the thrill in that area to not be split by the placket (the part to which the buttons are attached) the way they are on the bottom.
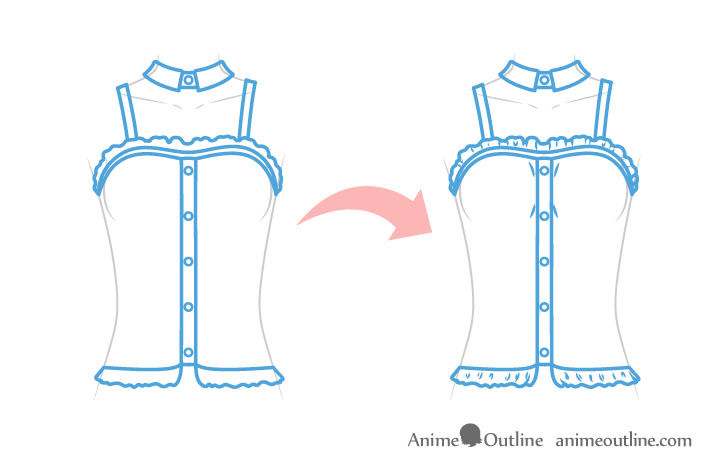
Star the blouse drawing with an outline of it’s overall shape and then add the smaller parts such as the frills, straps and buttons. As the blouse is quite tight there is no need to outline it’s sides, these are already defined by the shape of the body.
After you have all parts of the blouse outlined, add a few folds around the chest and a lot along the frills. These folds are small but very important details as they help create an appearance of volume and make the drawing look less like a wire frame.
How to Draw the Skirt
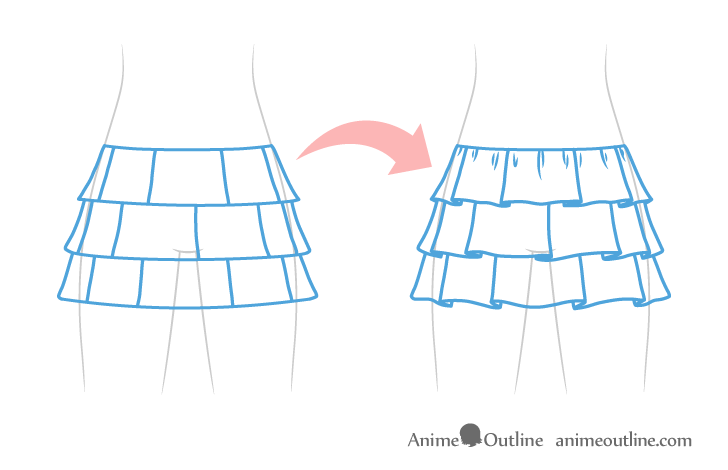
After drawing the blouse draw the skirt.
In this example it’s a fairly short multi-layered skirt that consists of three layers in total. While not particularly unusual, such a skirt is still a bit more out of the ordinary than something like a plain straight skirt and can be good a choice for a pop star’s outfit.
To draw such a skirt start with a simplified outline of it’s shape as shown above. Make this outline very light (barely visible). Next, using the basic outline as a guide add the folds along the bottom of each of the skirt’s layers. Because this part of the drawing is somewhat tricky you can again, refer to the video at the start of the tutorial to see it in more detail.
After you’re done adding the big folds erase any visible parts of the initial simplified outline. Finally, add some smaller folds along the top of the skirt that tend to be created as the fabric is squeezed by the waistband.
How to Draw the Hair Ornament
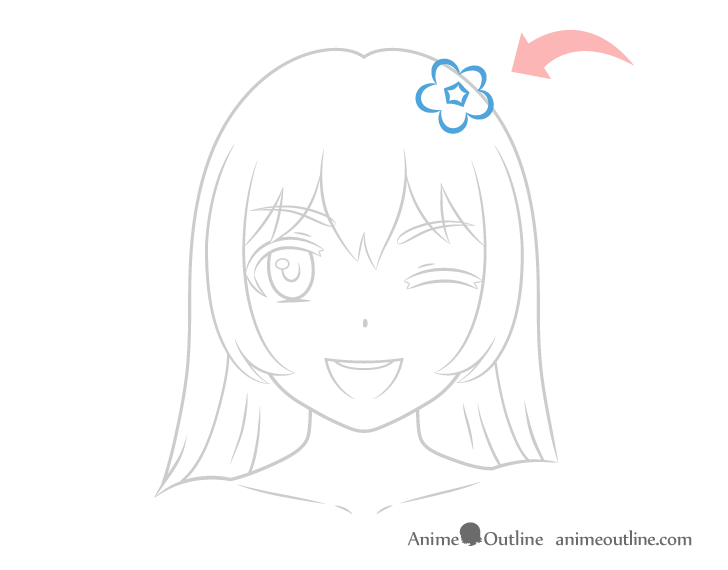
Adding an accessory such as a hair ornament/pin to an anime character can help give them a little more uniqueness/personality.
As already mentioned, in this case the ornament is shaped as a sakura flower. As sakura trees are common and popular in Japan such an accessory can be very appropriate for a Japanese pop idol.
Position the ornament to one side of the hair as shown in the example above. First, outline the shapes of the fiver petals that compose the flower’s main shape and then outline it’s center (shaped a bit like a star).
How to Draw the Shoes & Leg Ware
For the last part of the outfit draw the shoes and leg ware.
In this case the girl is wearing high heel shoes with straps around the ankles (strappy heels). Dress shoes are fairly common for celebrities and pop idols so they are good choice for this particular character.
The main shape of the shoes is already defined by the outline of the feet done earlier so simply outline their openings and then add the straps along the ankles.
After drawing the shoes draw the stockings.
In this case the stocking are somewhat unusual with large frills along their tops. Similar to the shoes being defined by the shape of the feet the stockings are mostly defined by the shapes of the legs. Simply draw the frills to show that they are there. You can also add a stripe below each of the frills to make the stockings slightly more interesting.
For more on drawing stockings and other types of leg ware see:
How to Draw Anime Socks, Stockings & Tights
Once you have all of the clothe outlined erase the parts of the body covered by them where needed.
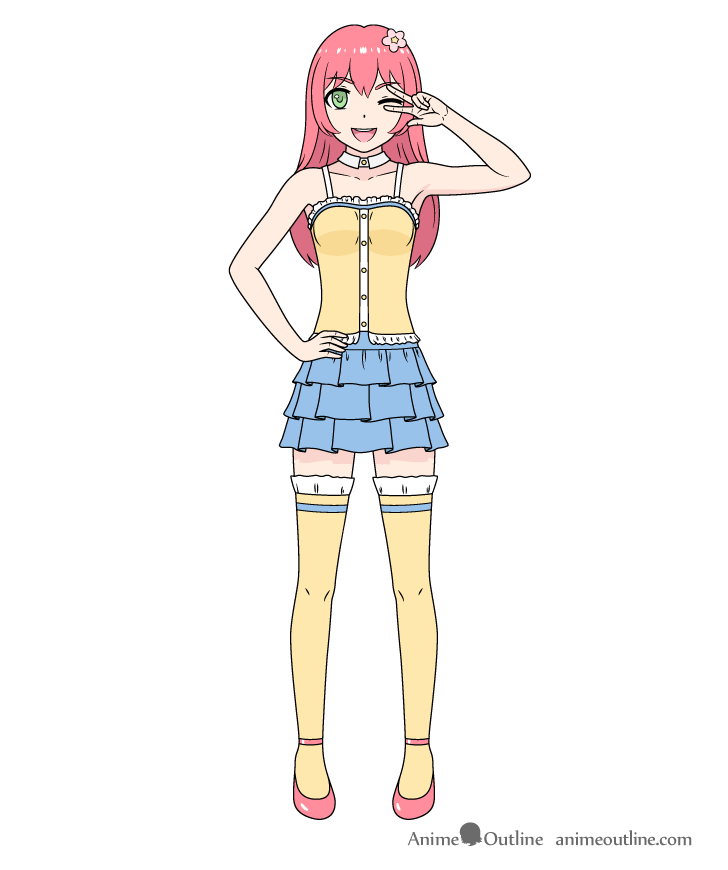
Step 10 – How to Color the Pop Star Girl Drawing
The last step of this guide is an explanation of the colors along with a bit of shading. To make things simple the shading is kept to a bare minimum.

The main color selection for this particular character is yellow, red and blue. For those who are not aware, these are the tree primary colors mixed to create all the other colors.
Such a color combination can be good for a lead pop star or idol character that is part of a bigger group as it can help emphasize their primary role. The only exception to this are the girl’s green eyes (or eye in this case). The green is a mix of blue and yellow and goes well with red due to being it’s complimentary color.
You can read more about different color combinations in the following guide:
Beginner Guide to Picking Colors When Drawing Anime & Manga
When coloring you will want to leave a reflection in the eye (added earlier), a streak of reflections along the hair and a reflection on each of the shoes and their straps. Keep all of these white. The reflection in the eye can have a black outline but don’t leave dark outlines along the rest. Outline these in pink/red so that the lines blend into the color of the hair/shoes. You can yet again, refer to the video to see how it’s done. If drawing digitally you can add the reflecting over top of the color.
Color the different parts of the pop star girl as follows:
- Hair – red (slightly pink)
- Eyes – green
- Blouse – yellow with a blue stripe (lave frills/shoulders straps white)
- Skirt – blue
- Stockings – yellow with blue stripes (leave frills white)
- Shoes – red (slightly pink same as hair)
- Skin – mix of light orange and pink.
After filling each area of the drawing with the appropriate color, add the shadows. An easy way to do so is to go over the color with a regular pencil (if drawing on paper).
In this example (to keep thing simple) there are only a few shadows that are placed in the areas they are most likely to appear in a well let environment with the main light source above the subject.
Darken the following areas of the drawing:
- Upper part of the iris of the open eye (also darken the pupil)
- Upper area of the inside of the mouth
- The inner/background area of the hair
- Neck (down to the collar bones) along with the collar and the button on it
- Arm pits and the under side of the arm doing the peace sign
- Lower area of the chest
- Inner sides of the skirt folds
- Upper areas of the legs (below the skirt)
Once again, you can refer to the video for seeing how each of the shadows is added in the different areas listed above.
After adding all the shadows you should have a finished drawing of an anime pop star girl.
Conclusion
Drawing an anime/manga pop star girl consists of many different aspects. Picking an appropriate pose, the right facial expression, hairstyle and clothes can all help make such a character easily recognizable for what they are supposed to be. This guide covers each of these in quite a bit of detail, however, it’s just one way to draw such a person. You can try changing things up to come up with a different look.
A great thing about using the “see through” approach shown in this guide is that in addition to helping you avoid mistakes it makes it quite easy to swap out various parts of the character. You can draw the same body but change the hairstyle and outfit. This is even easier if you are drawing digitally and can add as many hairstyles/outfits as you like in separate layers (depending on the software).
For some common mistakes when drawing anime and suggestions on ways to avoid them see:
Common Mistakes When Drawing Anime & Manga
For more similar drawing guides also try the following: